Summary
Prodoc allows you to choose the default set of forms that will be added to shipments based on a semi-hierarchical system where you can specify forms at various levels which are combined into a document recipe that matches the properties of your shipment.
Prodoc will add forms based on:
- System defaults
- Exporter
- Zone
- Country
- Customer
Form Setup is additive, so it will add all of the forms from each level when creating the shipment. You can configure destination, number of copies, etc. here and they will be applied when the shipment is created.
Understanding Form Setup
Form Setup is located from the Home screen in Edit -> System Configuration -> Form Setup
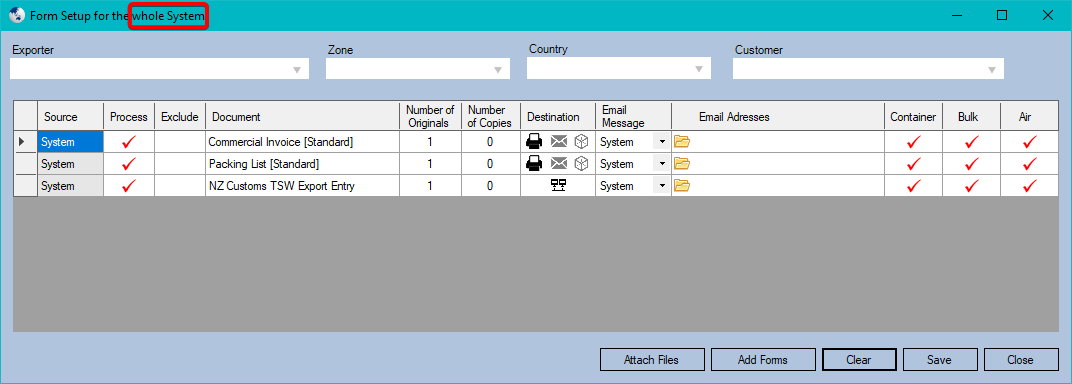
The opening view shows any forms that are added to all shipments in the system. Using the lookup boxes across the top of the screen will show the forms for that scenario. Below is an example with a customer selected:
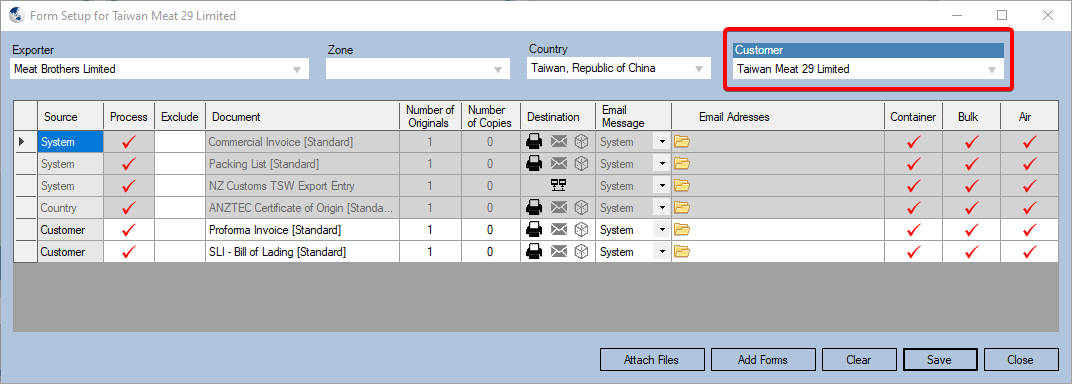
In the above example the Customer "Taiwan Meat 29 Limited" is known to be based in Taiwan, so that is automatically selected in the Country box and is associated with Exporter "Meat Brothers Limited".
If we create a shipment to this customer then we should expect to see 5 print forms (each set to print 1 original and 0 copies) and one EDI message.
The country/exporter shown when selecting a customer are based on the Prodoc customer record. If you import a shipment that uses the same customer but a different country/exporter you will get the defaults for the country/exporter indicated in the imported data!Another example using the same customer is shown below:
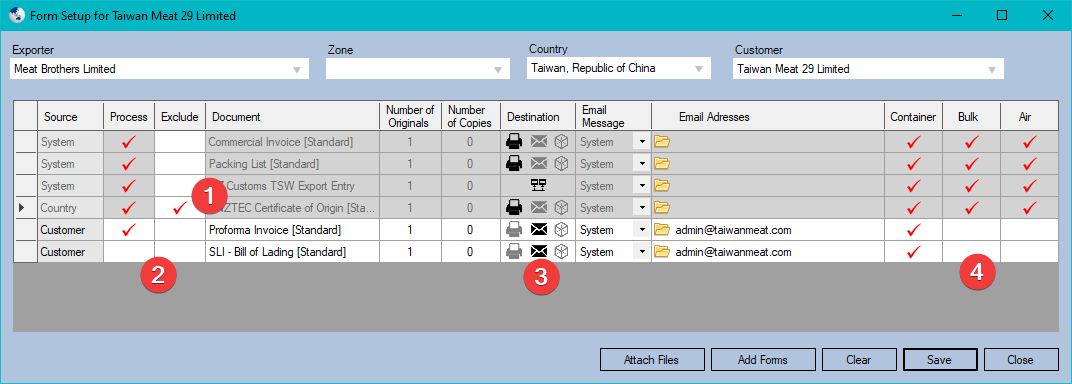
There are some key differences:
- We are excluding the ANZTEC form - this will not be added for this customer even though it is normally added for Taiwan
- The SLI form will not be ticked in the Forms screen when the shipment is created (if using Process All Documents it will not be sent by default)
- The last two forms are now set to be sent by email, with an email address supplied
- The last two forms will not be added if the shipment is Air freight or is not Containerised
Recommended approach to adding forms
Use the hierarchy
If you have 100 customers with around 7 forms each and set up forms for each customer that's 700 records to maintain. If 5 of those forms are added almost all the time then adding them at a system level saves around 500 of those records and you can set up exclusions for a particular customer/country.
Use country for market-specific forms
Add your China FTA Certificate of Origin to China, your ISF 10+2 to the USA, and so on. If you add these at system level you'll need lots of exclusions, and adding them to customer will mean lots of records to maintain.
Use email placeholders
Prodoc can automatically populate email addresses based on the content of the shipment, so use the email placeholder options to allow you to specify forms at a system level but have the appropriate email addresses appear in your shipments.
For example if my system forms use {Customer} and {Consignee} as shown here:

When I create a shipment these will be replaced by the addresses for the Customer and Consignee:

Using Form Setup
Selecting a record
Start by selecting the appropriate record to edit. If you want to change the forms added for all shipments then either choose nothing when opening the window or press Clear at the bottom to remove the selections from the lookup boxes.
To work on an exporter, zone, country or customer just start typing in the corresponding lookup box and choose the result you want.
Forms relating to your selection will be shown in white and can be edited. Forms inherited from other sources will be shown in grey and can only be excluded.
Adding Forms or Attaching Files
To add forms/files to the selected record use the Attach Files and Add Forms buttons at the bottom of the window. These operate just as they would in a Shipment, allowing you to either add externally produced files or to add Prodoc forms to the list of default forms.
Click Save when you have made your additions.
Configuring form options
Prodoc Forms will show either the standard three print options or the EDI indicator. For non-EDI forms you can choose between three options:
- Print
- Sets the form to be printed when processed
- Choose number of Originals and Copies in the corresponding columns
- Email settings are not required
- Email
- Sets the form to be emailed when processed
- Number of Originals/Copies is not required
- Email settings will be used for To, CC and Email Type
- Use the folder button to choose from your address book
- Placeholders can be used here for Customer, Consignee, etc and are denoted by {braces} around the name
- Cube
- The form will be uploaded to TradeWindow Cube
- No other options are required for Cube uploads
For EDI forms, no further configuration is required. If the form is EDI via Email (such as Chamber of Commerce) then the email address shown will be used as the destination.
For attached files, only Email and Cube options will be shown and operate as described above.
Click Save when you have made your edits.
Exclusions
You can choose to exclude forms added at a higher level (these are the greyed out records) so that the specified form is not added.
Exclusions apply to all instances of a form, so if you exclude a system level Commercial Invoice when configuring a customer record you cannot also add that form at the customer level for that customer.
Was this article helpful?
That’s Great!
Thank you for your feedback
Sorry! We couldn't be helpful
Thank you for your feedback
Feedback sent
We appreciate your effort and will try to fix the article